

|
|
|
BMW K1300GT / 2006+
K1200GT Verholen Peg Lowering Kits... Customer Comments |
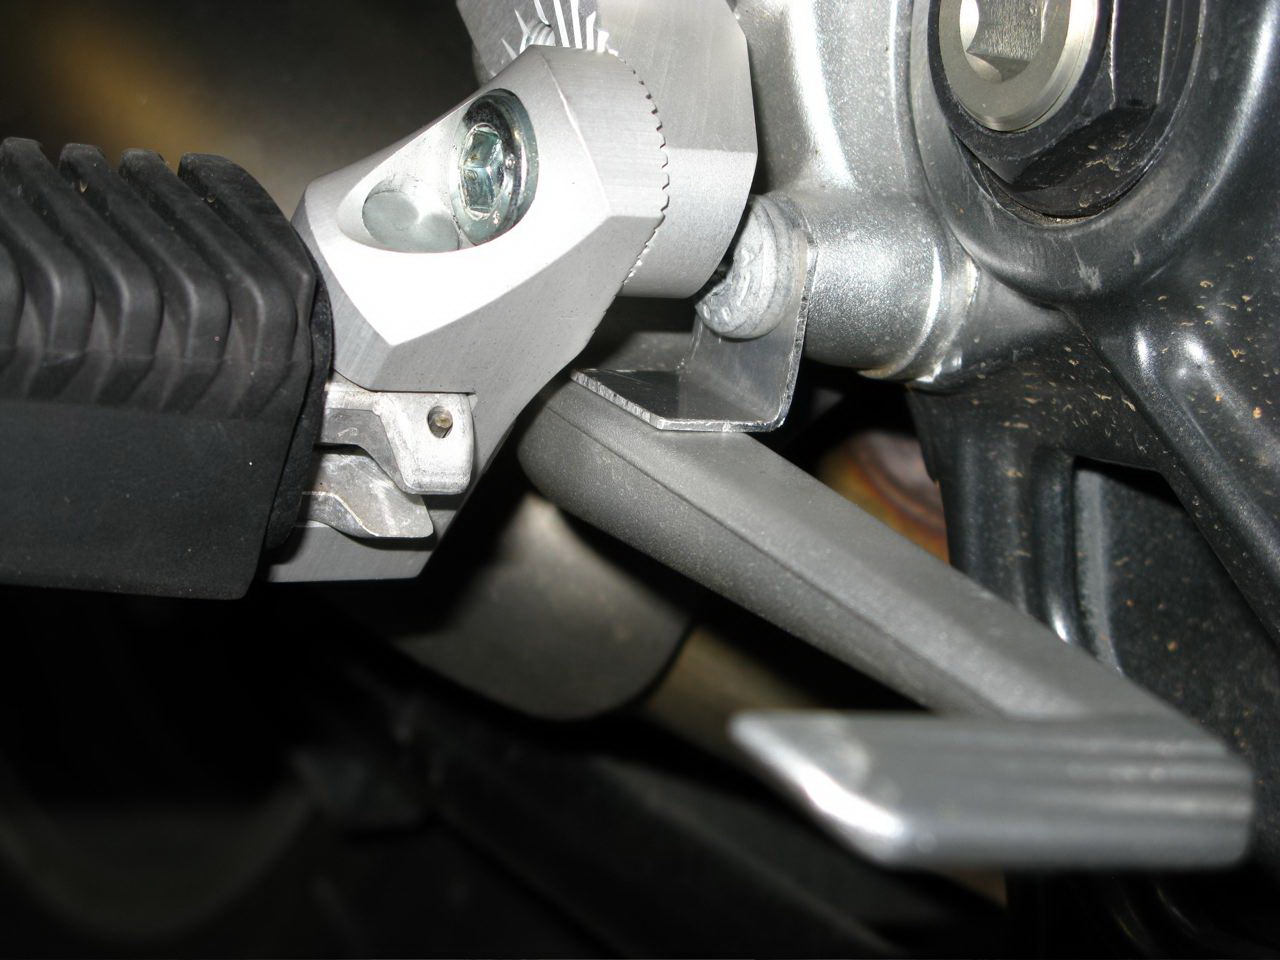
| Thanks again for your help yesterday installing my footpeg kit on the K1300GT. I thought you might appreciate some feedback on the kit and its installation. First, the Verholens have a feature which I have not seen on other manufacturers' similar kits for the same bike. The pieces for each side of the bike are in two parts that can be rotated/adjusted relative to each other. This is a very valuable feature. I was able to arrive at a perfect placement of both footpegs relative to the shift and brake levers. Without this adjustment I don't think I could have achieved a comfortable and safe result. Second, as you can see in the photo below, and after adjusting the rear brake master cylinder activator, I was able to get the rear brake pedal to stay in the perfect position for my boot to reach when needed while staying completely out of my way when cruising. I simply made an aluminum sheet metal "L" bracket and attached it to the frame with the conveniently placed existing frame bolt, also showing in the photo. In fact, one of the benefits of installing the lowering kit is that my boots are no longer touching the controls when I'm not using them because the lowering blocks move the footpegs an inch or so away from the the frame. That means, of course, that I have to turn my boot inward slightly to activate the shifter or rear brake, but that became automatic within a few miles. The bottom line is that with proper set up the Verholen footpeg lowering kit has made my bike much more pleasurable to ride, whether I'm blasting through the twisties or just cruising the highway. John Cilmi / 2010 K1300GT / Asheville, NC |
|
They are installed.
Easier than the US POS's I bought from Bob Henig, but the pin for the
pegs into the MV piece is a PIA. The flange is very tight against the
rubber, so you have to both push that back as well as keep on the retractor
spring, but with a vice and some rags or a good long punch it's not a
big deal for a farm boy. Lastly, I found one
other “be careful”. For me, now that the shifter is spot on
with the peg, there isn’t a lot of clearance between the shifter
and the tang on the side stand. You have to be careful when you hit the
tang with your heel to put the sidestand down, or you could knock it in
gear, if you had it in neutral. My bike is NEVER in neutral, so it’s
no big deal, but I have seen some guys that actually leave their bike
on the stand in neutral. |
| The brake
and shift lever adjustments went good! To adjust brake and shift all you
need is a 10mm open end. The shift adjust rod you need to loosen the lock
nuts. The lower has reverse threads. Then you can adjust the lever to as
low as you want to by twisting the adjust rod. The brake has a single lock
nut. Loosen it and shorten the rod by twisting it. Everything feels and
works good. The side stand is slightly less convenient because the pegs
are closer to it. I think they are cool. There is more than enough adjustment
in the shifter to make things work. After a couple trips around town and
readjustments, it's dialed in and perfect. The downside is the brake lever. There is a turn buckle on the shaft going to the master cylinder, but I don't see a stop adjustment, the lever is spring loaded and comes right up against the frame from what I can see. I adjusted the turnbuckle one turn in to desensitize it a bit, but I don't see it as a show stopper at all. Some might complain, and maybe there is a stop like there was on my RT that I can work with and then readjust the linkage, but I don't see it. As it sits, I can use the brake, it's fine, and I'm not going to bitch about it. Hey, I'm sold. I tried doing this on my RT, but the shifter was a bitch so I took them off and with with highway pegs instead for the occasional knee stretch. This is a much better setup than the one for the RT Kevin Ward / 2006 K1200GT/ Alberta, Canada |
| Just thought you you would like to get some feedback on the peg lowering kit that I recently purchased from you for my K1200GT BMW bike. A friend and I just came back from riding around Pennsylvania - 1600 kilometers of amazing roads. And much more comfortable legs - those ol' knees were so much better! Who would have thought just a couple of centimeters would make such a difference? Christopher Storey / K1300GT / London Ontario, Can |