|
|
|
Verholen
RS / GT Quick Shift Kit Install |
| This quick shift install is relatively easy even if your abilities are chimp-like. Took me an hour, but I could probably do it now in about 30 minutes. Is the kit worth the $200+? Yes and no... IMHO.. if you ride fast.. ride fast with other bikes..do track days..it's a must. If you take your LT-ish time and aren't into corner carving, then your money could probably be spent/invested/wasted elsewhere. After all.. the K12 isn't a horrible shifting bike... the ONLY problem is just the length of the throw. I have to admit. I was skeptical as to if it would be worth the money, but after 5 minutes using it, I was sold. Makes all the difference in "MY" fast world. My seat-o-da-pants observation is that the shift throw is reduced by 60-75% on my 98 KRS and shifting is now as quick as any Japanese bike I have ever ridden and... my MV Agusta... with that said.. here's how I installed the kit on my bike. |
| Parts/Materials
Needed: (1) Verholen Quick Shift Kit (1) hex wrench/key set (1) 10mm open-end wrench (1) small tube of grease (1) 1 beer (Imported only) |
 |
|
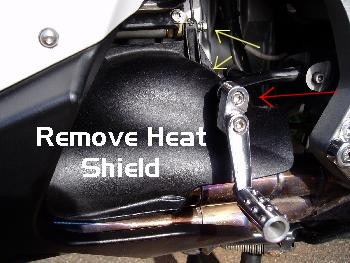
Step #1: Removing The Factory Heat Shield First step
is removing both the factory exhaust heat shield.. It doesn't get any
easier..
No need to remove any of the body work. Only
2 screws hold it on. You can make things easier by removing the shift lever before starting this install.. I didn't, but if I had to do this again.. I would. There is one screw that holds it on. (see RED arrow) Now, just reach
in there with an open end wrench, and remove the 4" long screw (see
upper yellow arrow/ pic at right).There is NOT a nut on the left end..
it just screws out. Then remove the other screw just below it (see
yellow lower arrow/ pic at right). The heat
shield will now come out easily if angled out towards the bottom. |
 |
|
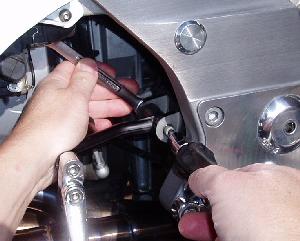
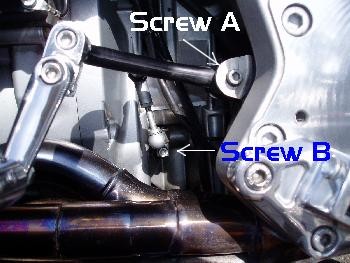
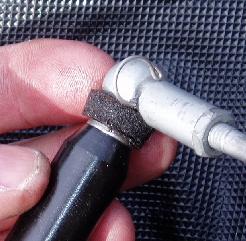
Step
#2: Removing
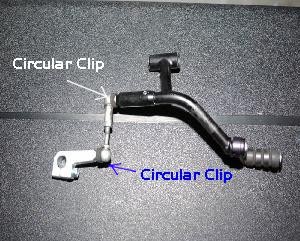
the Shift Lever Mechanism I removed the upper screw and nut first. Before you remove the lower screw.. make a mental note of the ANGLE it protrudes from the shaft. This affects the height of your shift lever. In order to have your shift lever in the same positing when the install is complete, you'll need to install the new piece AT THE SAME ANGLE. Once you remove the lower screw, the entire mechanism (center pic below) will slide off the shaft and out. At this point you'll need to separate the center shaft from the 2 ball-ends. There are 2 circular clips that will have to be removed first. (last pic below). They flip open and then slide out of a tiny hole. You'll see. Try not to lose them!! The adjustable center piece, which you will re-install with the new pieces, will snap off the ball-ends of the factory pieces with a slight pull once you get the clips off. When you re-install this adjustable piece, I recommend adding a dab of grease inside each ball-end hole. |
 |
| Re-install in reverse order and when you're done .. take that baby out for a test ride. Leave your tools out and your heat shield off as you may need to adjust the shifter height if you installed differently than the way it came off... as I did. Note: If you get the kit installed and it won't shift into first.(also like I did) ... it's simply because you have the silver piece installed tilted to far down. Simply remove it from the spline and silde it back on tilted a little further up and your problem should be solved. |
|
|
 |
 |