K1200RS/GT Gorilla Alarm Install How-To

Worried about some lowlife pilfering the love of your life... No.. not your wife.. your "other" love. Yes.. it happens, but here's one way to keep the Morlocks at bay. The Gorilla Alarm is supposedly one of the best on the market, getting great reviews from most sources. Install is VERY easy by even Jethro Bodine standards. Instructions are clear and you can knock it out in under an hour.. Is the alarm worth the price of admission? Absolutely! You might even qualify for an insurance discount. Bottom line,... $80 is not much to pay for the aforementioned saftey/financial concerns. The real perk of installing a bike alarm is the much needed piece of mind you'll have while you're sound asleep at the Microtel/Days Inn/Ramada and you can't quite see her from your window..... Here is MY humble How-To..
Parts/Materials Needed:
(1) Gorilla Alarm from www.chaparral-racing.com (about $80)
(1) handful of small zip ties
(1) hex wrenches (to remove fairing)
(1) Open end 10mm wrench (to loosen battery terminals)
(1) Industrial strength Velcro
(1) small tube Goop
(1) Six pack (Imported beer only)

Step #1: Preparation
The Gorilla module is a pretty good size when compared to most of the alarms I've installed over the years.. This is good for LOUD, attention getting sound, but bad for finding a mounting location. Fortunately, we K1200RS owners have a nice open space just under the left side body panel.

Remove the left side panel. If you've never done this, you might want to refer to Scott Marburger's How-To There's not much to it.. Takes me about 5 minutes. Once you get her panties off... er.. I mean the plastic off, you'll see the plastic flap just over the horn area and in front of the radiator.
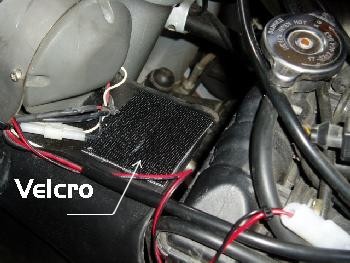
The Gorilla Alarm Kit comes with plenty of Velcro, but I prefer the PLASTIC type Velcro that you get at Radio Shack rather than the material-type. The plastic Velcro locks together and will NOT budge. Better safe than sorry. Being one sickly anal individual, I peeled the backing off the Velcro and applied gel-superglue around the edges and then a dab of water-proof Goop in the center.. Is all this necessary? Probably not, but I can't help myself.


Step #2: Module Install

OK.. Once the Velcro is glued down to the plastic panel, apply the matching Velcro to your module. I chose to have the wiring exiting the module close to the fairing and facing rear so when you put it all back together, all wires will be out of view... a good thing for an alarm.

Stick your module in position. In the pic to the right, you'll notice that I have my module sandwiched between the radiator and my cruise control. If I did NOT have the aftermarket cruise, I would have positioned the module a little further away from the radiator. As is, I have about 3/4" clearance. Plenty.

On the Gorilla Alarm.. the wiring is simple.
Red to hot at battery
Black to ground at battery
Blue is antenna
Red (smaller) is your flashing warning light
Black (smaller) is your external motion sensor


Step #3: Running Wires

The instructions say the install should take about 20 minutes, but it took me about an hour. Mostly because I wanted to run my wires professionally.. I ran the Red power wire and the Black ground to the battery first. Then ran the Blue antenna along the left side. It doesn't attach to anything.. Instructions just say not to coil it around anything.. and I didn't. I zip tied every wire about every 10" or so... for neatness.

The other (2) wires... the Warning Light and the Motion Sensor will run up front..


Step #4: Warning Light

Instructions say for you to drill a 8mm hole in the plastic somewhere on the bike for your warning light. It needs to be visible so the sorry little bastards out there thinking about stealing your ride will see it FLASHING RED and move on the the Kawayamasuki/Duc/Ural parked next to you . I took a different approach which proved VERY easy and emotionally satisfying.

In the metal support bar that stretches between the dash and the frame on every K1200RS/GT, there are already holes cut out. I took a 1" rubber grommet (purchased at Home Depot for 50 cents) and slipped it into the top hole on the bracket. The warning light slipped right in to the grommet perfectly. Too easy.

I then ran the wire under the dash, zip-tieing here and there for cleanness, and then plugged into the module wire. Sweet..


Step #5: Motion/Tilt Sensor

The tilt sensor has to run side to side on the bike.. Parallel with the dash. They suggest under the seat, but the wires were not long enough so I wedged this tiny piece between the dash and the metal frame that supports it. It slid in there perfect. A couple of zip ties and "vunderbah!" That's it..

Before you put the plastic back on.. you can now grab your remote and test the unit. It's as simple as clicking the top button on your remote. A quick chirp and she's armed. Click it again and it's off. Click it again and it's on. Click it again and it's off. All work and no play make Jack a dull boy. All work and no play make Jack a dull boy...er.. Sorry.. a "Shining" moment....

There are tips in the instructions for adjusting the sensitivity, but mine seemed fine. All installs should be this easy.


Overview: Finis

Reinstall her panties... er..your plastic, add the little remote to your key chain, and your done. One cool thing about the Gorilla Alarm .. You'll notice a second button on the remote. For $19.95 + shipping, Gorilla offers a garage door opener interface that you can order as an option. It's a 2-wired black box that attaches directly to your garage door unit (and it even comes with a second remote) which allows you to open/close the door with either of the tiny programmable remotes.. Very cool as most garage door remotes cost over $40 in most stores. I've already ordered the kit.

Did I mention that this sucker is LOUD!! It's alternating two tones are seriously, painfully loud ... as it should be.


B A C K